Lab 1: Introduction to CSC148!
Learning outcomes
By the end of this lab, you will be able to:
- Identify and use course software, including: the Python programming language, PyCharm, MarkUs, and
Piazza.
Note : even if you are used to a different Python editor (like WingIDE or Idle), you must complete all parts of this lab, so that you become familiar with PyCharm-specific tools like the debugger, highlighting problems in your code, etc.
- Locate and organize course files on your computer.
- Use a debugger to trace the execution of a Python program.
- Test a Python program with
doctestandpytest.
Another important outcome is that you will have met several other people who are taking CSC148.
Meeting people
To start off the lab, prepare to meet some interesting people! Navigate between breakout rooms, introduce yourself to classmates and find a group for this lab. You may use breakout rooms 1-16 to work with your group. Make sure one person is screen-sharing.
Setting your computer
Each person in a partnership should set up for working on the course by completing the Setting up your personal computer section. Before moving forwards, let each member of your team share and make sure that they have completed the Software guide. We want to make sure every student is set up for this course!
PyCharm introduction
Choose one member’s computer to use for the remainder of the lab. But make sure each member understands every step taken (and that you each complete the “Submitting work on MarkUs individually” on your own MarkUs account)!
- Start PyCharm and make sure the csc148 project is opened.
- In the Project View, find the
lab1folder. - Right-click on the
lab1folder, select “New -> File” to create a new file, and enter the filenamenames.txt. - The file will appear in the Project view, and you’ll be able to edit it directly in the main Editor view. Type in your name, and save this file.
Congratulations! If you’ve both reached this point, you and your lab partner should each be set up for CSC148.
Simple testing with doctest
Please review the Function Design Recipe handout with your group. This document provides a template for how to approach writing functions that we’ll use through this course.
The Function Design Recipe has us include example function calls in our docstring, and the final step is to
test our code using these example calls. A module called doctest allows us to run these
automatically, to see if our code does what the examples show!
-
Download this Python module called
search.py, saving it in yourlab1folder. Open this file in PyCharm, but don’t worry about reading the code right now. -
Run the doctests in the module as follows:
- In the Project pane on the left of your Pycharm window, find
search.py. - Right-click on it, and select “Run ‘Doctests in search’”.
- A new “Run” pane will appear. On its right side, it will report “Process finished with exit code 0”. On the left side, read the report. It should tell you that both doctests passed. If you see a “DeprecationWarning” reported, you can safely ignore it.
- In the Project pane on the left of your Pycharm window, find
-
To see what happens when doctests fail, temporarily change one of the doctest examples so that correct code would not pass.
-
Rerun the doctests and observe how PyCharm reports doctest failures. Then repair the doctest example and rerun the doctests to confirm that all is well.
Fuller testing with pytest
That was great, but we don’t want to clog our docstrings with too many test cases. A module called
pytest allows us to write further unit tests in a separate module.
- Download and save module
test_search.pyinto yourlab1folder. Read through this file. - Replacing the XXXXs in the code so that it tests searching for the value
5in the list[0, 5, 10, 15, 20, 25, 30, 35, 40]. - Run your testing code by right-clicking on
test_search.pyand selecting “Run ‘pytest in test_search’”. - Read the test results. Spoiler: this function has a bug!
Using the debugger to find a bug
Now let’s try out the PyCharm debugger to narrow in on the bug.
- Find the line in your test that calls function
binary_search. Click near the line number to create a red circle. This is called a breakpoint, and you can think of it as saying “stop here”. - Run the testing code using the PyCharm debugger, which will stop at your breakpoint:
Right-click on
test_search.pyand select “Debug ‘pytest in test_search’”. - Execution of your code has stopped at the line with the breakpoint. Now we are going to control
execution one step at a time. To do so, find these arrows below the code:
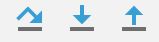
Hover over (but don’t click on) each to see what it does. - Let execution progress one step into the function by clicking the Step Into arrow (it’s the middle one out of the three pictured above).
- Look at the Variables pane below your code. It shows the value of each variable. Handy!
- Continue stepping and watch the values change.
If you have time, use the information provided by the debugger to determine what went wrong. If you realize you have stepped past an important event, you can restart the debugger. You may find a memory model drawing helpful.
If you still have time left, try to fix the bug. How do you know you’ve succeeded? Run the tests again! Well, not quite, because you do not have a thorough set of unit tests.
Your final task is to identify and implement a systematic and thorough set of tests, and see if you really did fix the bug. Try to answer the following questions:
- What principles are you using to generate test cases?
- How do you know when your tests are “thorough” enough?
What to do if you’ve finished every part of the lab
If you reached here, great! Here are some suggestions for things to do.
Exchanging contact info
We hope you’ve had some fun and met some students with similar interests. You may later want to form study groups, so you should consider exchanging contact information. Don’t just talk to your partner—talk to all the students you met at the start of the lab.
Review the memory model
Take out those worksheets from our first few lectures and make sure you’ve finished them. Since you’re in a computer, now is a great time to check your understanding: type in each code snippet into the Python Console (or into a separate file to run), and see that the output matches what you expected based on your diagrams. Don’t be shy about asking your TAs questions here, too!
Python programming exercise
For extra practice with programming in Python, we’ve adapted a set of in-class exercises from an older CSC108 instance. You can find the full description in the worksheets below:
- Worksheet 1
- Worksheet 2
- Worksheet 3
- Worksheet 4
- training text: adele
- training text: alice
- training text: beatles
- training text: shakespeare
- training text: zelda
Download the starter code random_story.py and follow the instructions contained within.